Registration
Registration is optional, however doing so will allow you to save your pins between sessions. Registering is quick and easy, and completely free (for non-commercial use). To register, click here.
Quick Links
Use one of the links below to jump to what you're keen to learn about.
About the map page
How to find a location on the map
About our map layers
How to create reports
More advanced features
Maps
The map page consists of a main map window, surrounded by a series of panels and controls which enable map navigation, map viewing, querying for data and reporting of the soil map layers.
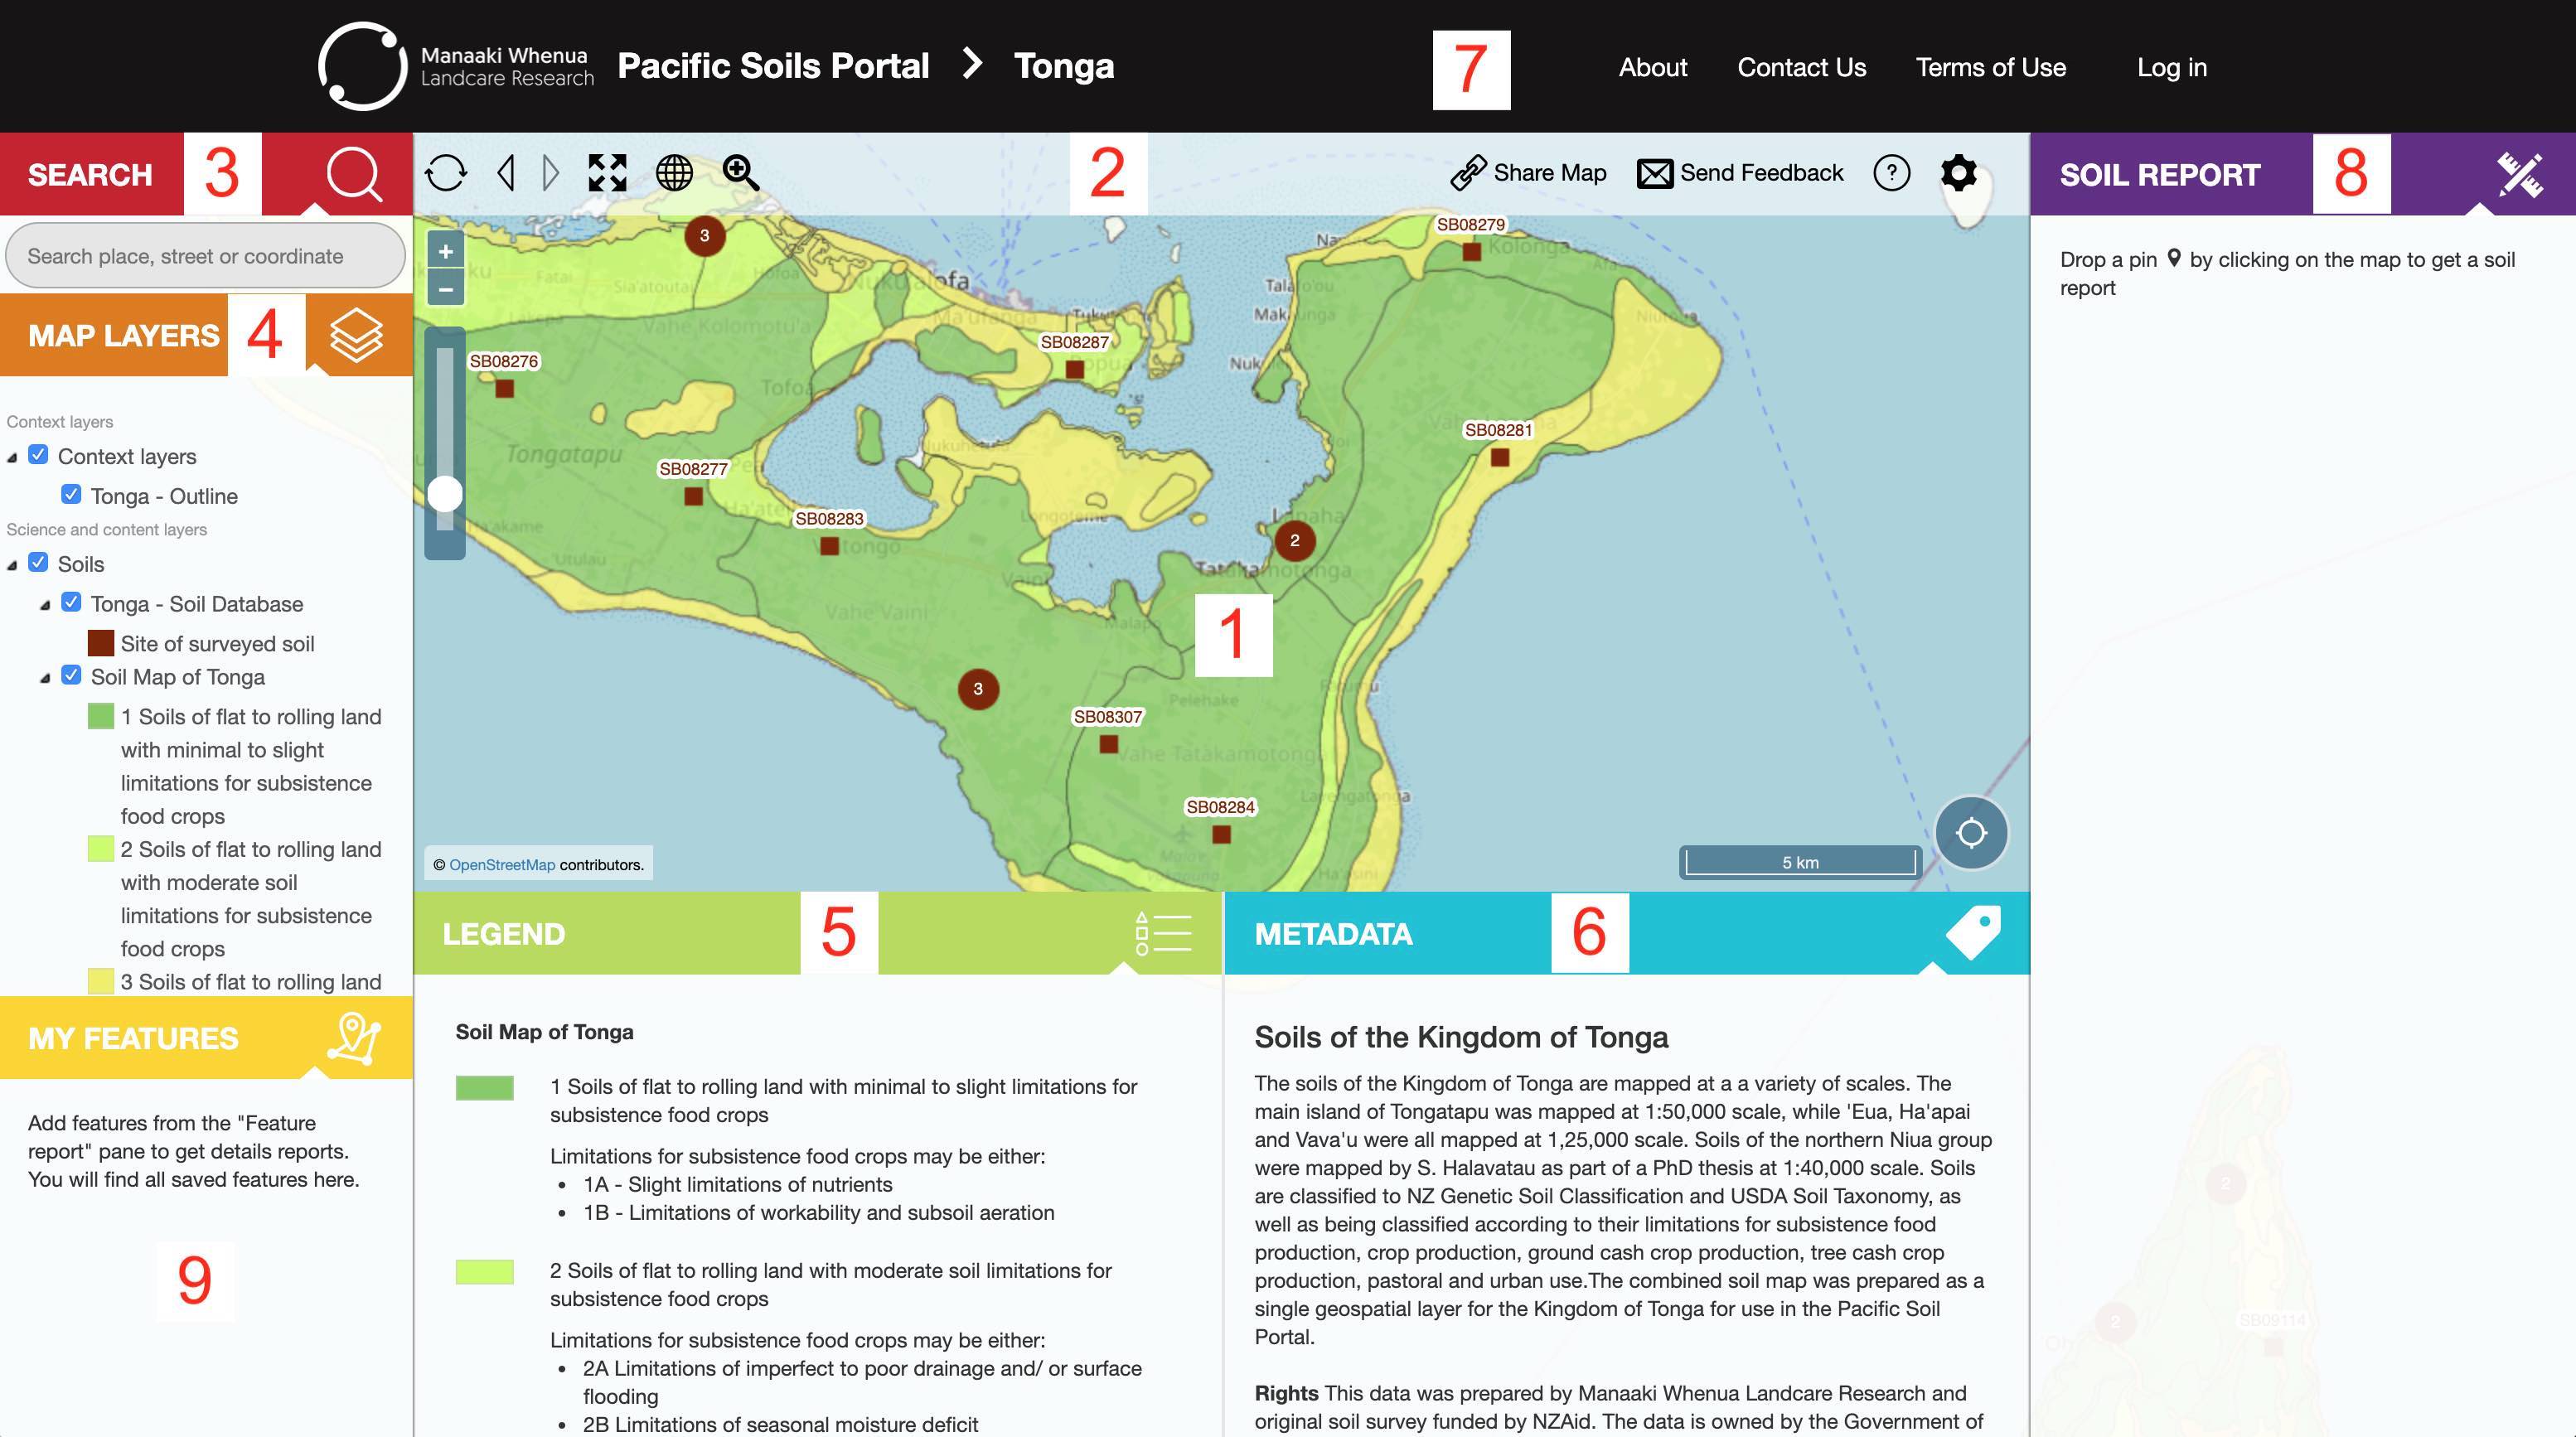
Fig. 1. Map page.
1. Map window - Interact with and view maps. Learn more.
2. Control panel - Various controls. Learn more.
3. SEARCH panel - Search for a particular location using geographic coordinates, a place name or an address. Learn more.
4. MAP LAYERS panel - Control which layers are drawn on the map. Tick check boxes to turn layers on or off. Click layer name to view information about a layer. This will be displayed in the METADATA panel. Learn more.
5. LEGEND panel - Displays a map key.
6. METADATA panel - Displays descriptive information about the selected map layer, including a link to download the original data, if available.
7. Navigation panel - Links to different pages of the site and other sites of interest.
8. SOIL REPORT panel - Add features of interest to the map to generate a report.
9. MY FEATURES panel - If you save a pin, this is where they will appear.
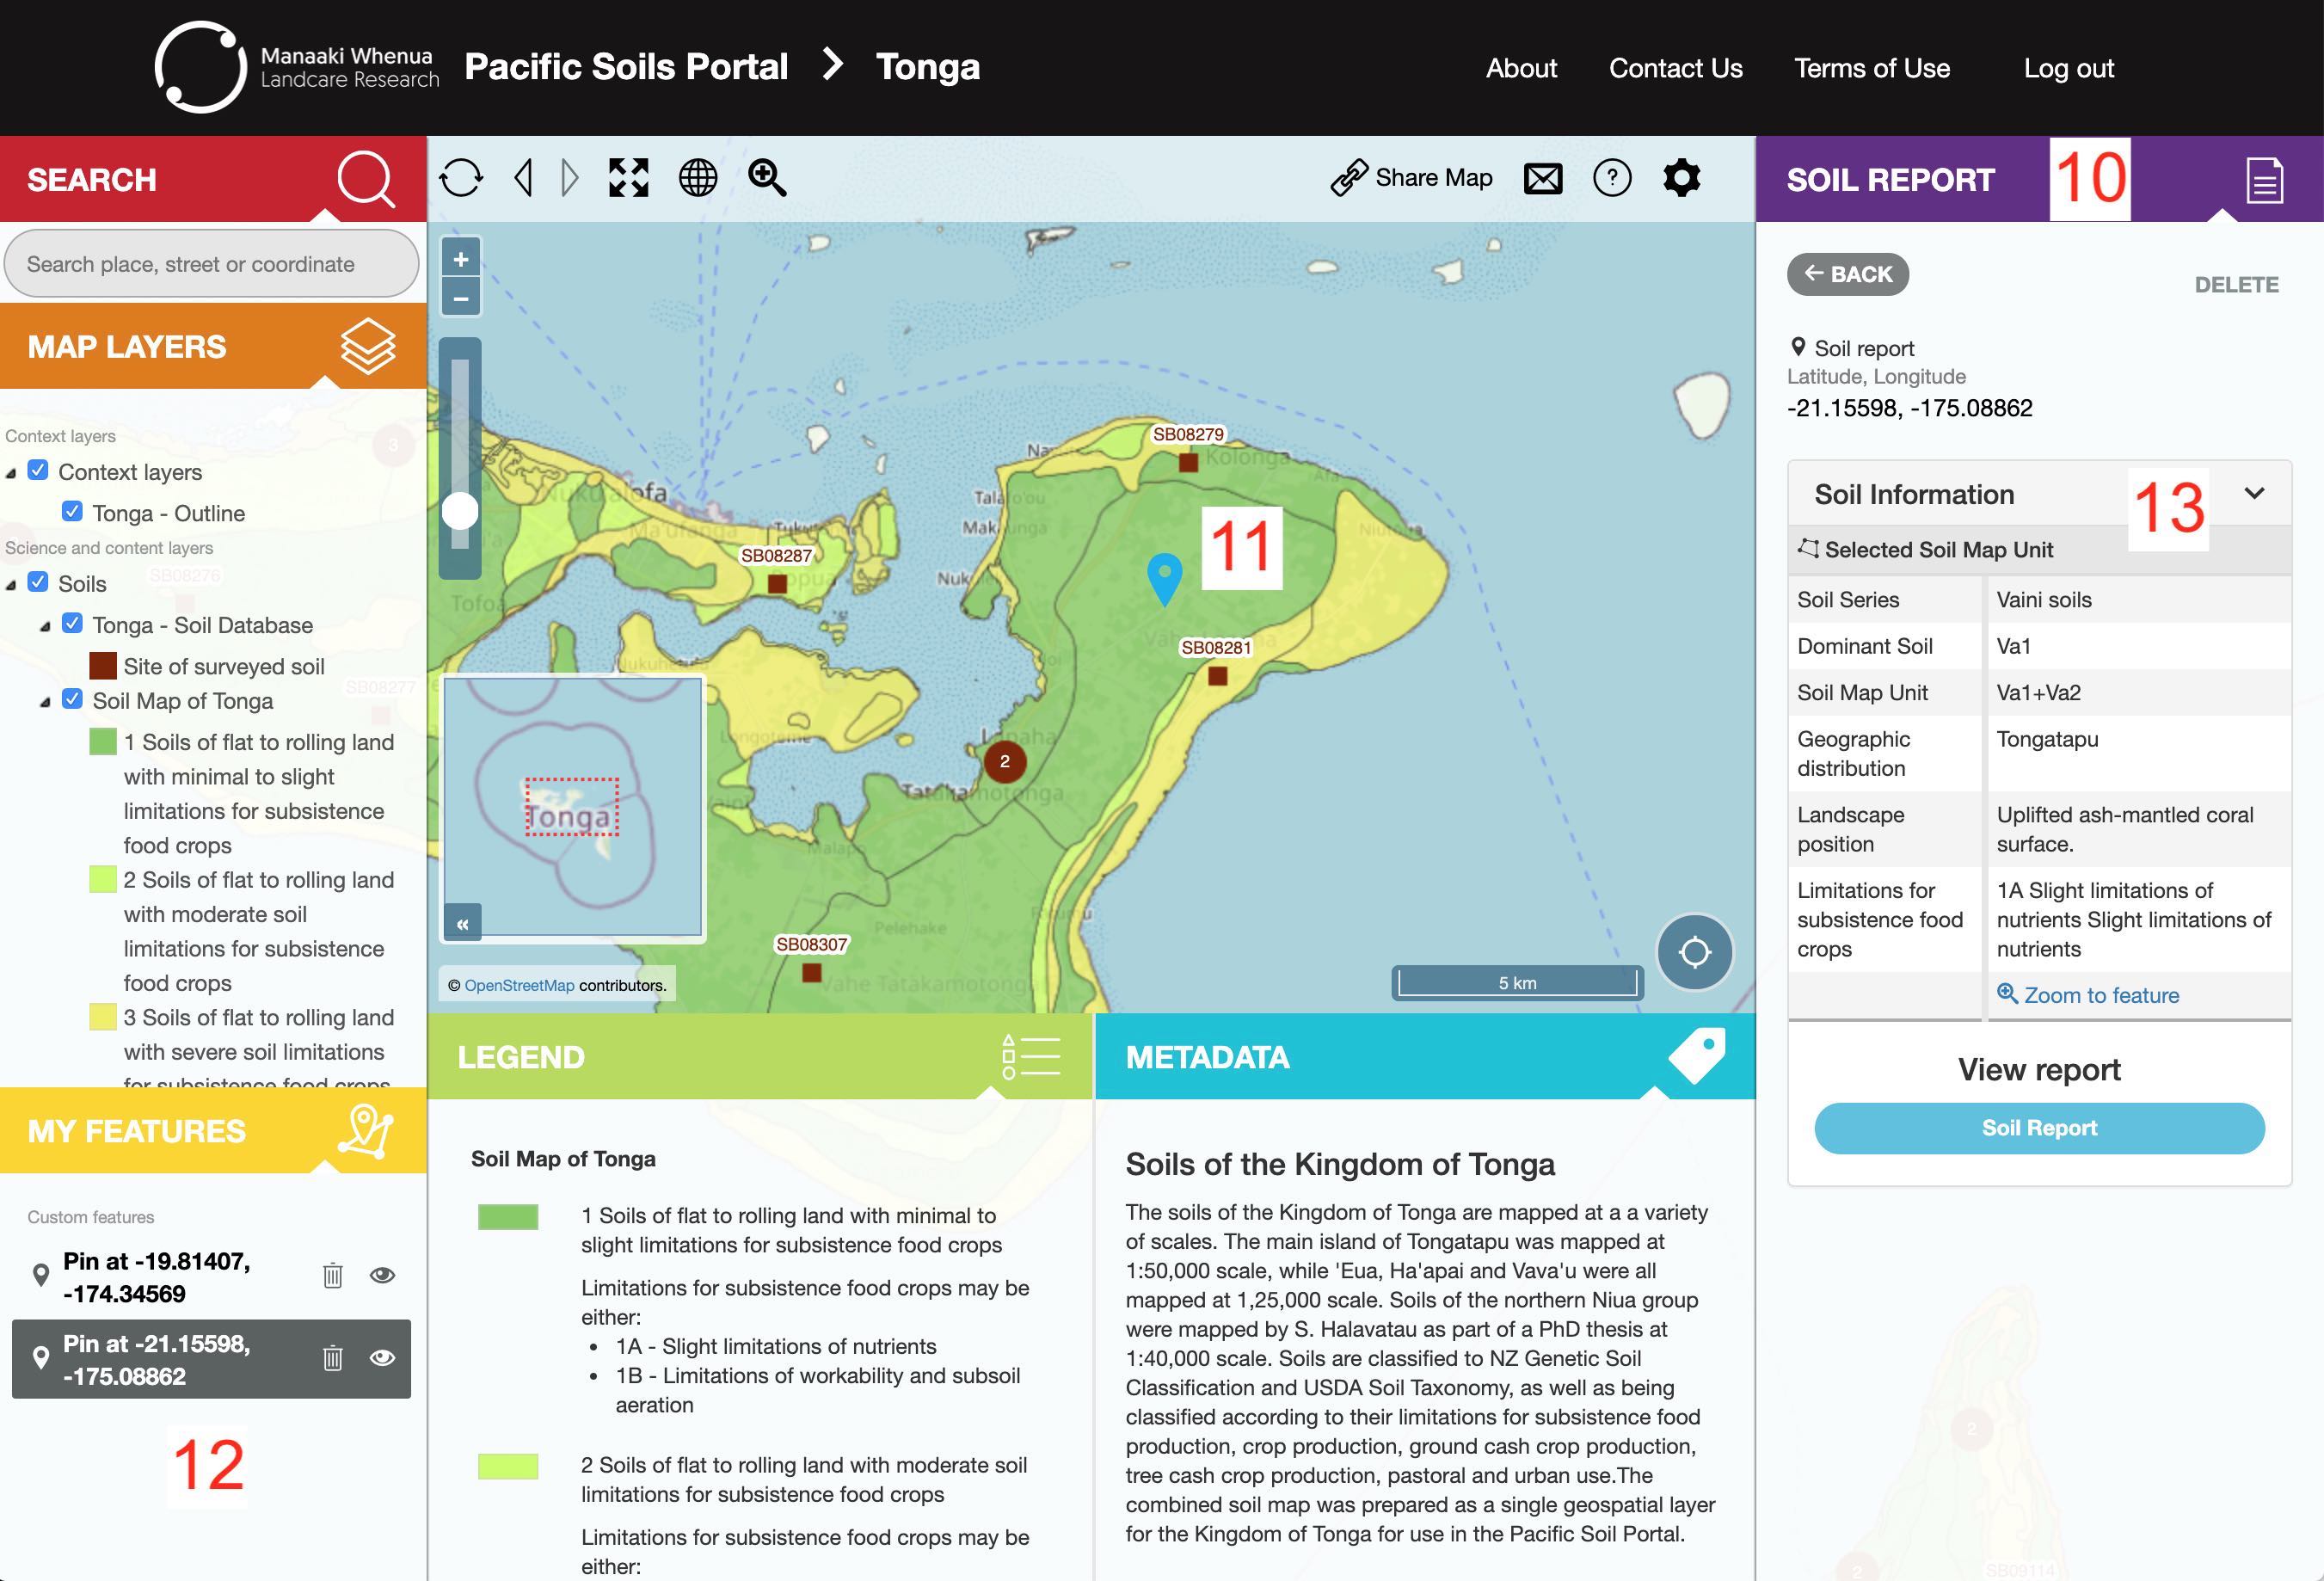
Fig. 2. Map page, after feature information query.
10. SOIL REPORT panel - Returned information is displayed here. Learn more.
11. Dropped feature information pin.
12. Saved pin - Return to report for that pin at later date.
13. Report preview window - Short version of generated report. Click on "Soil Report" button to view full report.
The Map Window
This window contains various controls which you can use to interact with the map. You can also interact with the map (zoom in and out) using tools in the Control Panel.

Fig. 3. Map window.
- Zoom buttons - Zoom in and out of the map.
- Layer transparency - Alter the transparency of the soil layers.
- Overview map - Shows the larger geographic context of your current map.
- Locate me - Zoom map to your current location.
- Scale bar.
- Attribution - Copyright information.
The Control Panel
This panel contains a number of controls relating to map interaction and interrogation, along with other functionality such as sharing and advanced settings.

Fig. 4. Control Panel.
- Reset - Reset map and layers to default settings.
- Previous / next extent - Cycle between previously viewed maps.
- Full screen - Switch to full screen mode.
- Max extent - Zoom the map to full geographic extent.
- Zoom to rectangle - Draw a box on map by clicking and dragging out a box. The map will redraw using your rectangle as the map extent. (Mode change)
- Share map - Create a URL link which you can copy to share the current map with other users.
- Send Feedback - Opens the contact form for sending us feedback or telling us about a problem you are having.
- Help - Display summary help window.
- Settings - Displays the advanced settings window. In this window you can change the image resolution of the map, allow more control of map layers, and change the interaction style between mouse and touch (if you have a touch enabled device).
Interacting with the map
To move around the map, click and drag the map to pan (move) to another location.
You can zoom into the map (to see more detail) and zoom out of the map (to see less detail) in a number of ways.
- To view more or less map detail, use the zoom buttons (3a).
- Double-click to zoom in closer or use your mouse's scroll wheel to zoom in and out.
- To zoom to a particular portion of the map, you can switch to "Zoom to rectangle" mode (4f) by clicking the button. Click and drag out a box of the map area you are interested in. Release the mouse button. After releasing the mouse button, the map will automatically zoom to the area that was selected. You need to select the button to turn off zoom mode.
- Alternatively, while holding down the SHIFT key, click and drag out a box of the map area you are interested in. Release the mouse button.
- If needed, you can repeat the same steps to zoom further into the area. Finally, to zoom to a particular scale e.g., 1:25,000, select a scale from the scale drop down menu (4b).
To move quickly to a particular part of the country, use the Overview map (3c). The Overview map shows you your current location on a smaller scale map. You can move the current map view to another location by clicking on the overview map, or by clicking and dragging the small crosshair / dotted box. To hide the overview map, click on the "«" button to the bottom left of the overview map.
Finding a particular place on the map
If you are looking for a particular place, the quickest way to find it is to use the SEARCH tool (3). Searching works with geographic coordinates, a place name or an address.
To search using a place name or an address User
If searching for a place name or address, the tool should recognise what you are typing and show you a list of suggestions. From the suggestions list, click on a place name or address to display the map of that location. You can also select a place name or address using the up and down arrow keys and the enter key.
To search using coordinates
Type the coordinates into the search box (e.g. -21.1297, -175.2949). Press the return key to display the map of that location.
In all cases, the place you are looking for is shown on the map by a red flashing dot.
Viewing map layers including soil information layers
You can view the different soil layers using the MAP LAYERS panel (4).
Make sure the MAP LAYERS panel is expanded by clicking the button. Tick a box to view the layer on the map.
Learning about a particular map layer
The METADATA panel (7) displays background information about the layer you have currently selected. Further details about particular features (classes) making up a layer can be found in the LEGEND panel (6). To view this information, click on a layer in the MAP LAYERS panel (4), and make sure the METADATA (7) or LEGEND panel (6) is open. The active layer will be highlighted.
View information for a particular location / area
You can view a report for a selected layer in the SOIL REPORT panel (Fig.2).
You can obtain reports for a single location.
Step 1) If you haven't already down so, choose a soil layer to display on the map.
Step 2) Choose what you want the report to be based upon.
Step 2a) ![]() Drop pin on map: the report will be generated by you clicking on a location on the map. A pin marker will appear at the location you have clicked.
Drop pin on map: the report will be generated by you clicking on a location on the map. A pin marker will appear at the location you have clicked.
Once the report has been requested a textual report will appear listing attributes about that location, key properties, the Latitude/Longitude coordinates for that location.
Select the BACK button to go back to Step 2.
Step 3) Full Report: Click the "Soil report" button, and a more detailed report will be generated for the location in question. This opens in a new window an example of which can be seen below in Fig. 5. The report is then accessible in your MY FEATURES panel, after you close the report window.
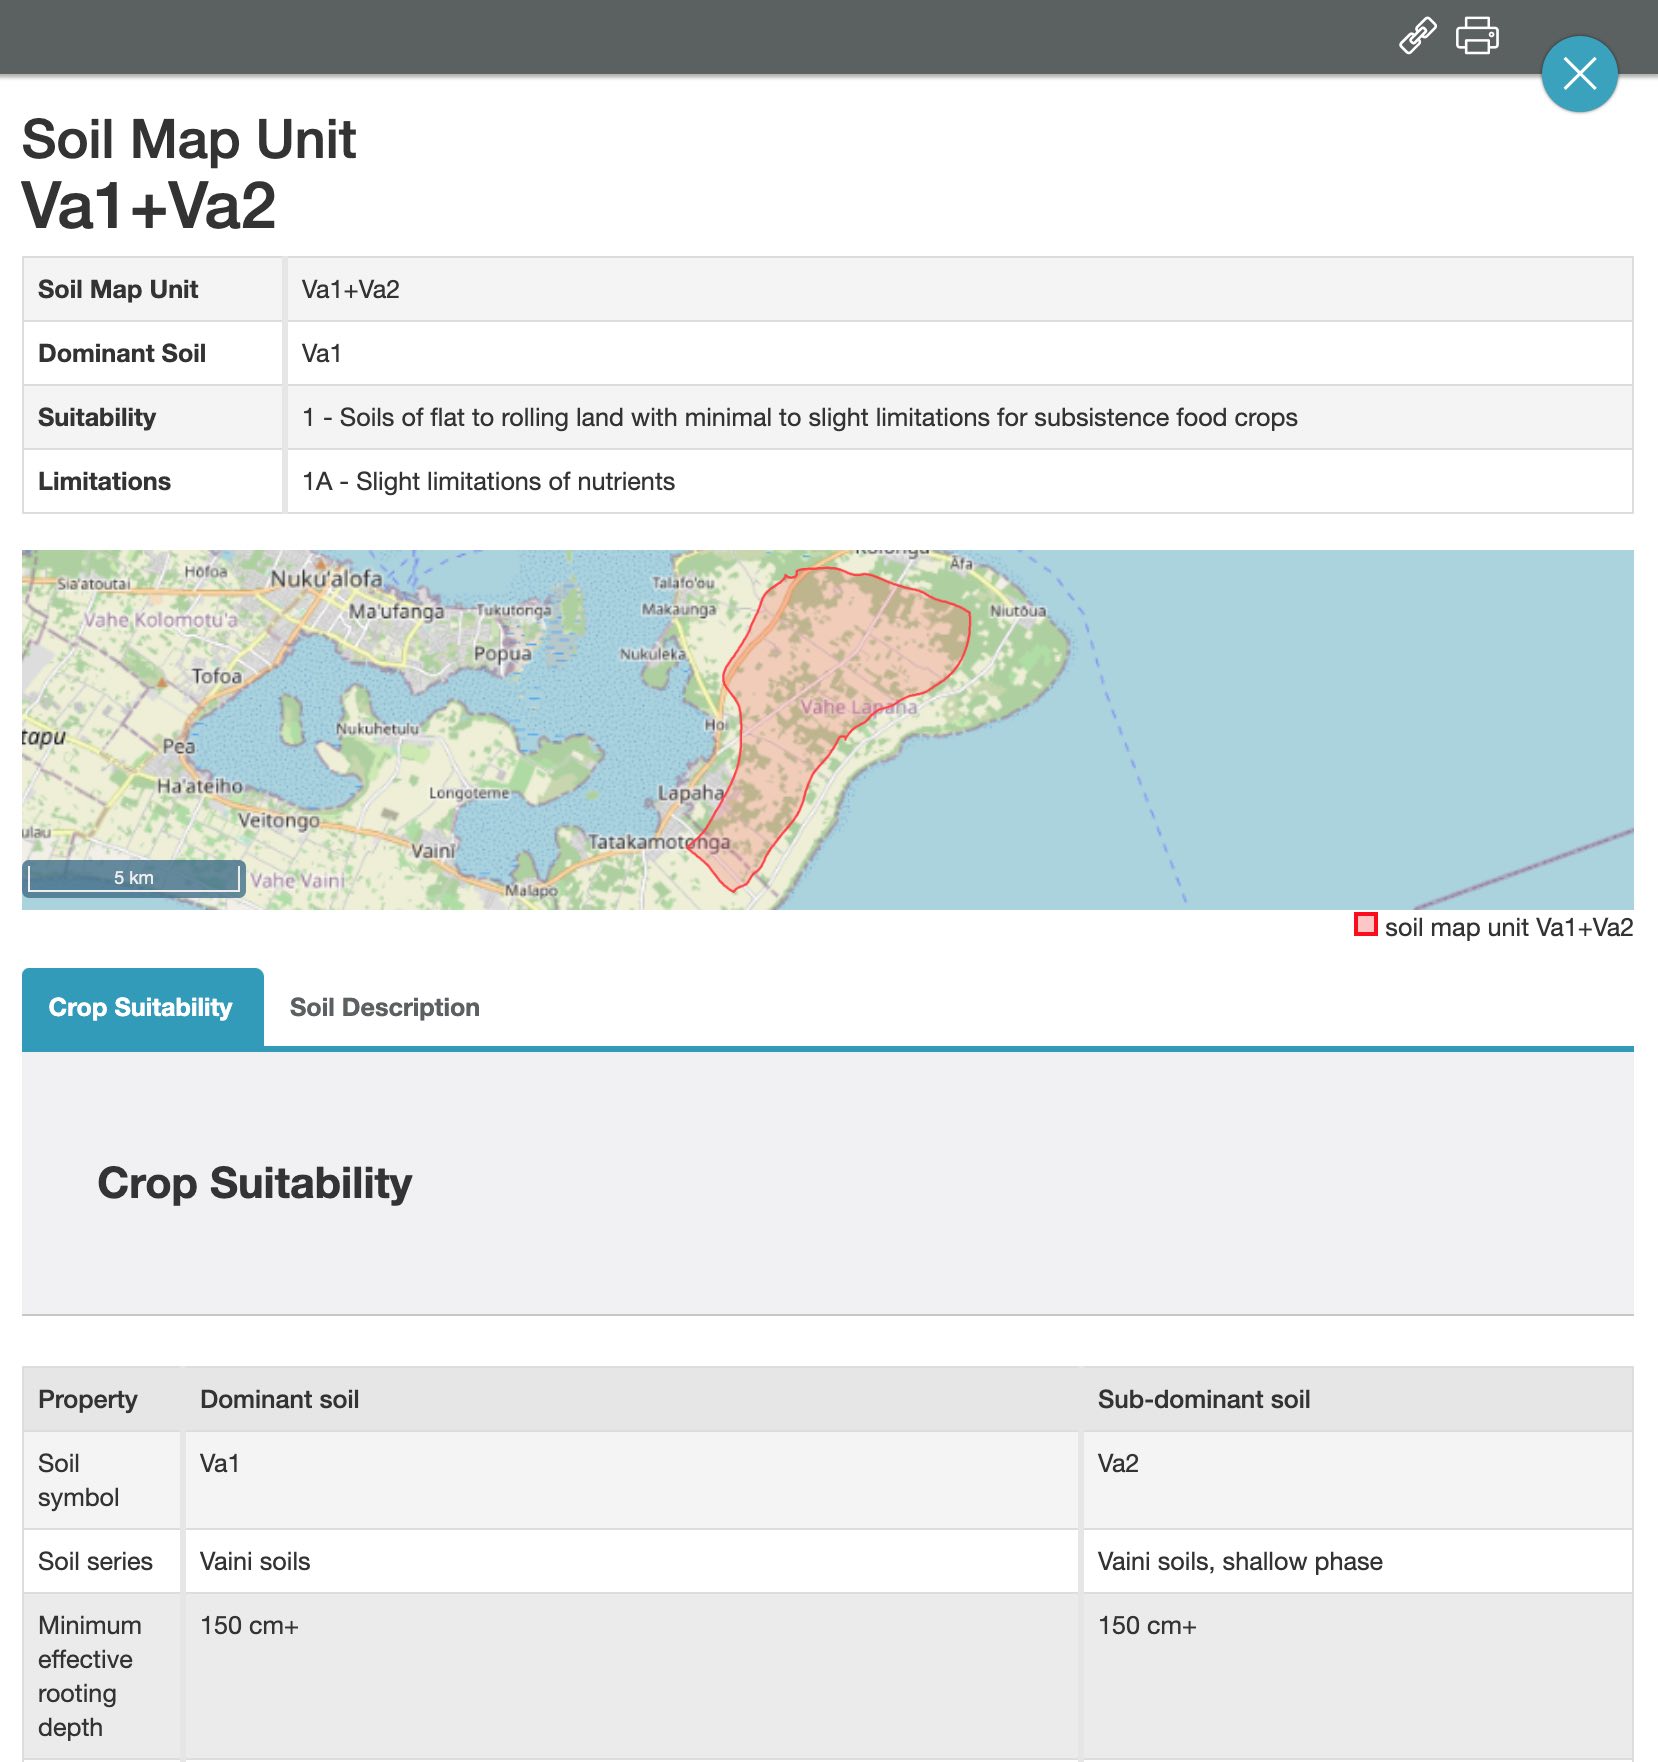
Fig. 5. Report window.
In this window you can:
- View the location / area of the report in a mini map in the top right of the report window.
- Change the report by clicking on the "Crop Suitability" or "Soil Description" tabs.
- Print the report by clicking the button and following the instructions in the print window dialog.
- Generate a shareable link to this report by clicking the button.
Saving your Pins / Features
If you have registered, and are logged in, you can save your pin / feature so that it's available when you login again later. If you want you can give the pin / feature a name. Do this before clicking the SAVE button. Choosing SAVE will add the pin to the MY FEATURES panel (9). Pins are stored and will appear in the MY FEATURES panel when you next use PSP. You can delete saved pins using the DELETE button. You can also zoom the map to the location of a saved pin by clicking the checkbox for the pin and clicking on the ZOOM TO button.
Deleting Pins / Features
You can delete a pin or feature by clicking REMOVE in the SOIL REPORT panel.
More advanced map features
Altering the transparency of a map layer
You can use the Layer Transparency slider (3b) to vary the transparency of a layer displayed on the map. This allows you to gradually fade-in/fade-out the layer against the basemap.
Activating Locate Me functionality from within the map
Click the Locate Me (3d) button to zoom the map to your current location.
Changing the underlying base map
By default, map layers are shown on top of a topographic Open Street Map. However, some map layers are easier to read on top of alternative base maps (e.g. "World Imagery"). You can change the basemap by selecting a different base map in the MAP LAYERS panel (4).
Resetting the map back to a national extent
At any time you can click the globe icon (4d) on the top bar to reset the map extent.
Returning to a previous map view
Use the back arrow (4b) in the toolbar to see the maps you were looking at previously. You can also use the forward arrow (4b) to go forward through the maps you have looked at previously.
Maximise the size of the map you can see on the screen
You can hide all various information panels, thus increasing the size of the map you can see on the screen. To do this, click on the name / icon of the panel you wish to minimise. Clicking on the name / icon again, opens the panel.
Go Full Screen
You can make the browser window go into full screen mode by clicking on the button (4c) .
Last updated: 24 April 2020